How to Find Duplicate Photos in Windows 10, 11 [Easily & Quickly]

Here is how to find duplicate photos on Windows 11/10 to free up storage space. Continue reading!
Do you wish to organize your Windows 10 computer’s excessive number of images by using a straightforward process? You should start by deleting all of the duplicate photographs from your computer.
Having duplicate photos on your computer is a waste of disk space since they are essentially useless. In this post, we’ll go through many techniques to find duplicate photos in Windows 10/11.
Duplicate photographs take up space on your Windows PC and might complicate your photo organization. They could even make viewing photos unpleasant. Therefore, it is necessary to frequently find and delete dupe shots so you can get the best experience possible on your Windows PC.
Simple Methods to Find Duplicate Photos in Windows 10, 11
Following are the different ways to find duplicate images on Windows 11, 10 PC and quickly remove them from your system. There’s no need to try them all, just work your way down until you find the best method for you. Now, without further ado, let’s get started:
Method 1: Delete Duplicate Images for Free Using File Explorer
File Explorer (previously known as Windows Explorer) is a file management application that comes with the Microsoft Windows operating system to manage duplicate photos. It lacks the capability to deal with duplicate photographs. However, there are several ways that make using File Explorer reasonably fast to find and delete duplicate images from a PC. However, the procedure might take some time. Here is how to find duplicate photos on Windows 10/11 this way:
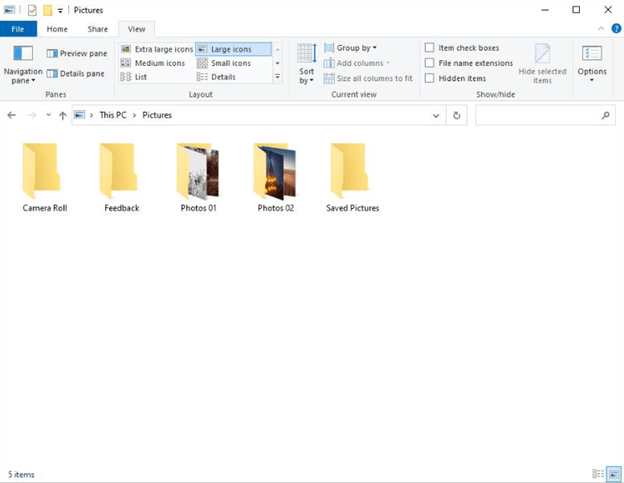
Step 1: Launch File Explorer on your Windows desktop or laptop.
Step 2: Open the folder containing the duplicate pictures, such as the Pictures folder, in order to locate and remove them.
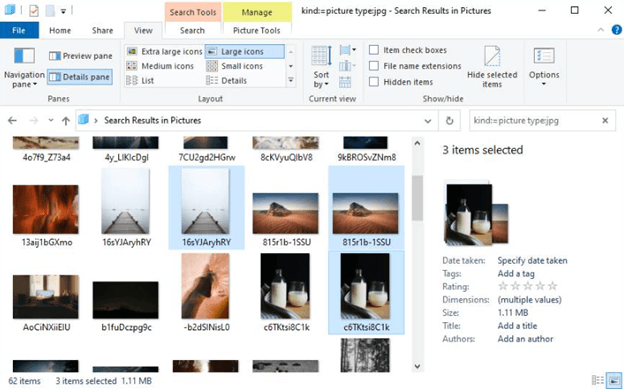
Step 3: Type “kind:” into the search box and choose Picture from the selection menu that displays. If there are any subfolders in the folder, they will also be shown together with the rest of the images.
Step 4: Select Large icons or Extra large icons under the View tab. Additionally, choose the Details pane.
Step 5: Select Sort by Name or Sort by Size from the drop-down box.
Step 6: Examine the displayed images and look for duplicates by comparing the data and content of the images.
Step 7: Right-click on several undesirable duplicate photographs and choose Delete.
If necessary, the picture format may be specified in step 3. As an example, typing “kind:=picture type:jpg” will show all the JPG images. See how easy it is to find duplicate photos on Windows 10/11 via File Explorer.
Also Read: Best Free Duplicate File Finders & Removers
Method 2: Free Removal of Duplicate Images from the Microsoft Photos App on Windows 10/11
The Microsoft Photos App, commonly known as Windows Photos or just Photos, is used by certain Windows users to organize their images. Microsoft Photos is an image viewer and management program that comes with Windows 8, 8.1, 10, and 11 and serves as the replacement for Windows Photo Gallery.
You must first disable the Linked Duplicates option in order to search for duplicates in Microsoft Photos. In order to improve the photo browsing experience, the option to conceal duplicate images is enabled by default. The option does not remove duplicates, as should be noted. Go to Settings in Microsoft Photos and change the Linked duplicates toggle to Off to disable this feature.
You may now start looking for and deleting duplicate pictures. To do so, follow the steps below:
Step 1: Launch Microsoft Photos on a computer running Windows 10 or 11.
Step 2: Secondly, choose the Collection tab.
Step 3: Look over your photographs and compare them to find any duplicates.
Step 4: Click the Delete icon in the upper-right corner of the window after selecting several redundant duplicate photographs.![]()
Step 5: To delete the chosen duplicate pictures, click Delete in the dialog box that says “Delete these files.”
Method 3: Using Best Duplicate Removal To Find Duplicate Images
Both methods 1 and 2 might take a lot of time and effort, particularly if you have a huge collection of photos. It might be difficult to manually separate many duplicate picture files from the real ones in certain cases. Fortunately, you can locate and delete these identical images from your computer using certain expert tools. The good news is that the job can be automated with Quick Photo Finder.
Quick Photo Finder

In Windows 10, Quick Photo Finder makes it easy to find duplicate photos so you may remove them and free up some space on your hard drive. Using this program, you may visually compare photos to find duplication rather than relying on file formats or names. Additionally, it aids in a more accurate examination of the files that are susceptible to duplication. It is the best Duplicate Photo finder for Windows 10/11 that you should use to automatically find and get rid of duplicates on your device.
Additionally, you can scan the whole computer at once with this software. To check for duplicate photos, you may also input a specific location or folder. This procedure might take some time, particularly if you are unclear about the whereabouts of any duplicate images.
Read A Complete Review of Quick Photo Finder
Bonus Tip: Useful Ideas to Cut Down on Duplicate Photos
You may use a few strategies to eliminate duplicate images if you want to skip going through the complete process of locating and deleting duplicate photos from your Windows 10/11 PC. Here are a few tips:
- Please take care while transferring photographs manually from one device to another. It’s possible that you’ll unintentionally duplicate the same image more than once.
- Create folders to arrange your images so that there are fewer photos in each folder. Your computer will prompt you to change the current photographs if you accidentally upload the same picture again. By doing this, you can immediately see whether you are replicating an addition that you have previously made.
- The file name of duplicate photos often includes a number (for example, Img_240.jpg vs. Img_240(1).jpg or IMG_240 copy.jpg). As a result, you can tell if one picture is a duplicate of another if they both have the same file name with a number appended at the end. That is the image that you should throw away.
- Likely, the pictures you find in an image folder with extensive names aren’t the real thing. In this case, click the “Properties” tab and examine the picture size to see the photo details in more detail. It could not be the original image if the photo is just a few KBS in size.
- To prevent destroying crucial images, preview copied images before deleting them.
- Using cloud storage services like Google Photos, which catches duplicate picture uploads right away, is another way to prevent uploading duplicate photographs on your PC. Even Google Photos sometimes fails to recognize identical images. To organize all of the photographs, you may need to make albums in the app.
Final Words
Regularly clearing duplicate images from your computer may be quite advantageous. For modest picture collections, duplicate pictures may be removed from Windows 10/11 for free using File Explorer or the Microsoft Photos app.
You need specialized software to delete duplicate photos from any size or kind of picture collection fast, efficiently, and consistently. Additionally, it is advised to keep duplicate images out in the first place. We hope the guide on how to find duplicate photos on Windows 11/10 helps you in the best way possible. Please feel free to share your questions, doubts, or further suggestions in the comments section below.
Do subscribe to our Newsletter and follow us on Social Media so you never miss any tech updates.


